Humble Beginnings
When we got home we laid it all out on the patio to see just what we had to work with. We set up the loop of indoor track that it came with to make sure it worked, and sure enough it did. I'm glad we didn't buy all that extra track, since it would have been useless outdoors in the weather for any length of time. It's good enough to show that it works, but now I know I need more track, and a place to expand the layout.
Inspired by our 30th anniversary trip to the Cass Scenic Railway, deep in the mountains of West Virginia, Ann gifted me a garden scale Bachmann Shay engine for Christmas. She let me open it early and I was thrilled, both by the gesture and its impressive size, so I gave her a Virginia & Truckee ten wheeler set with quite a few passenger cars to get us started. It was the motivation we needed to expand the simple oval of track to something bigger and better.
I slowly started acquiring track and rolling stock, in addition to our Christmas presents to each other and our new Royal Blue set. I started with a simple oval on just the patio using the 10' diameter Aristocraft stainless steel track. I also snagged a pair of Aristocraft wide radius stainless steel switches and some straight (tangent) sections of various lengths. You guessed it... The original switch loop.
Surrounding The Pool
It just went from there. We tried the loop within a loop pattern, but the switches and crossings I have are two different angles. It appears the switches are roughly 20° (19° perhaps?), but the crossings are 30°. I didn't think it was going to be like the HO scale 18" radius switches that have a little 10° chunk to add to make it fit like a full curve section.
So instead of doing a loop within a loop, we (I say we) decided to go around the pool with all the new track I have from eBay, sharing the 10' diameter loop on the patio with the new larger loop. Turns out that's too much track to step over, so I decided to make it just a siding to park the engine and cars when not running them around the pool.
Even with a reliable loop of track around the pool, it gets old just watching a train run around it. We soon expanded into the side yard, complete with a "wye", a long passing siding, and a water feature.
Ten Wheeler Upgrades
I've been doing some research on the Bachmann site, trying to find out what they have in the way of spare parts for our engines. Turns out not much. In fact, it's difficult to even find what might be close short of looking through every large scale part. It became so confusing, I put together a page with pictures of all the different styles of ten wheelers and their associated part, just to keep them all straight.
Why do we need to keep it straight? Every so often Bachmann will have a sale on replacement parts, and if you have some of the older style ten wheelers that use some of the early generation mechanisms, like we do, you'll probably want to upgrade them to the latest fifth generation mechanism. Why? They're much more quiet and reliable than the early styles, and chances are eventually you'll have to replace a motor or gearbox in them anyway.
Another consideration is the lower cost versions' details are generally cheaper plastic parts compared to the anniversary editions' beautiful and shiny metal parts, not to mention the extremely detailed valve gear compared to simplistic plastic siderod pieces. So when I can get a brand new bottom half, with all metal side rods and valve gear, and a brand new mechanism, motor, gearbox, and all for $55...
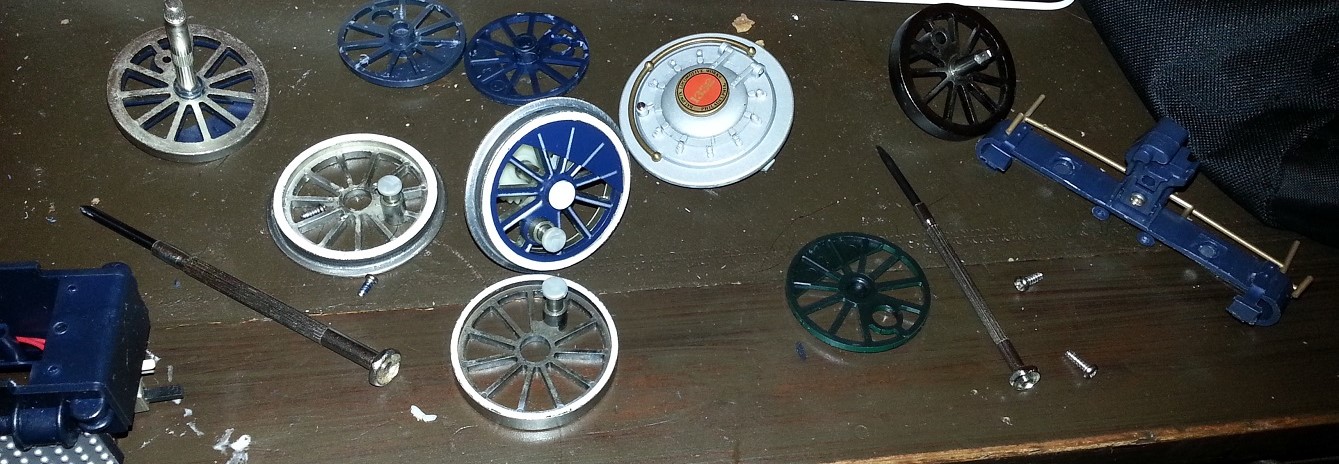
Of course I bought a set to replace both of the ten wheelers in our iron horse stable at the time. The other thing I picked up was a new tender base with new style sound card and metal wheels, for just $40! Now the old style card in the Royal Blue will be replaced with a new one, not to mention swapping out the plastic wheels for blue painted metal wheels. Now all I need to do is swap the guts from the new green base with full metal side rods and valve gear into the old blue shell.
They didn't have a replacement with blue drivers for the ten wheeler, so I'll have to take both the old and new ones all apart to swap the blue colored insets with the green ones. Unfortunately the base of the new one is black, not the Royal Blue color, so I'll need to use the old base with the new guts. Sounds simple, right?
Wrong. Not only is the new motor mount different, but so is the way the gearbox fits in the base. What starts out as simple minor modification quickly turns into major surgery. Even the driver axle bushings are different. Everything else is just material removal until things fit. The axles are totally different between the two, so although it's material removal until they fit again, they're different sizes and profiles on the new one. I do the best I can, but can't get it perfect.
I won't bore you with more details here. Suffice it to say I got it all back together and it runs much better, but could run better yet if I had just used the new bottom shell instead of the original reworked to fit everything. I use this engine as the workhorse for testing and dirty or dangerous conditions since it still isn't anything fancy and I don't much care if it gets hurt or damaged in the process.
Into The Wilderness
I'd been reading about a number of different approaches to garden scale railroading. Most folks agree that you need to raise it off the ground. Some folks want it on the ground, and will go to the extra effort to pour concrete "roadbeds" for their track. It seems the main reason for keeping the track off the ground or pouring concrete is frost heave. Considering we don't really get cold enough, long enough here in Florida for the ground to freeze, there's nothing to worry about.
While we don't have to worry about frost heave, we do have to worry about the availability of other roadbed materials like crushed granite, crusher fines, or the many other names for compactible road base. It's not readily available near us, at least, not anywhere I've looked. We've got coquina rock out the wazoo! But nothing that fits the bill like road base would.
I used that reasoning for our first incarnation in Wekiva. I just laid the track directly on the ground, after removing the sod and levelling the grade of course! Ballasting the track in place should be sufficient, and short of a washout of major proportion, no need to worry about a more secure attachment method. This plan worked well using bags of concrete aggregate for the ballast. The concrete aggregate works, but it's much larger than scale and doesn't compact like road base would.
Hard to believe it all started from a much smaller oval of track on the patio that grew into a larger oval of track all around the pool with some sidings on the patio. When that became too much of a nuisance, it was modified to run along the house from the patio out into the side yard. Constructing a "wye" track just outside the pool screen room put my "wye" switch to good use. It allows a train to turn around and go in either direction.
It took up a good part of the yard between the corner of the house and the big oak tree, where the pad ended and the dirt began, but I was able to drive over it with the lawn tractor and mow where the track wasn't. The only problem was all the weeds that would grow up through the track and all that sand and dirt that got into everything, like the workings of the switches and cars and engines. Everything.
Despite the pitfalls, ground level trackwork allowed me to introduce a water feature without needing any major bridgework, just some civil engineering for the embankments, and a water hose to find the "low ground". Once I found the natural runoff path, it was easy to replace the sandy bottom with backer board and colored mortar, a short section at a time.
It eventually stretched from one end of the yard to the other. It grew to include a small scale pond! The idea was to collect the water from the low end of the yard and pump it to the high end so it could flow back down again. Just the flow of a garden hose was enough. The ground level route soon became the water level route, complete with a passing siding. I was limited only by my imagination (and the amount of track I had).
Again, you can read about all of this elsewhere, but it is important to the discussion because I learned that track on the ground has its own pitfalls.
Moving To Mount Dora
Back then, all I had was my radial arm saw, and it didn't like ripping without the proper hold downs. Unfortunately, the hold downs didn't work all that well since I had stripped a couple of the set screws. I got one because my dad had one, so I was familiar with it, and it let me do a lot of woodworking over the years. But now it's just sitting in the garage over at the house in Wekiva, as useless now as it was then for ripping 2x4s into strips to build the splined roadbed stringers out of.
So I bought myself a present when I was ready to rebuild the carriage doors, a table saw, knowing there was no way I could do it with the radial arm saw. I learned how to use the table saw while building the new carriage doors, and didn't really need any special equipment or attachments to do so. I did need a miter gauge to do some of the more intricate work of building trestles and bridges.
That was the pitfall of raising the track off the ground at the other house, I had no way of ripping the material for building the roadbed. There are other reasons for not placing the trackwork directly on the ground, read "foreshadowing".