(September 2016)
At first we planned a "folded dogbone" layout, with an upper and lower loop, but this time the plan is different. Instead of being able to run the loops parallel to themselves and the garage, we'll need to curve away from the garage towards the fence. Ann is worried there won't be enough room to run the track that close to the walkway and the patio. I rethink the plan and decide to have the bridge span what may eventually become the water feature, but will now be where the lower loop crosses under the upper loop. The upper loop comes back to meet itself, running parallel and downhill along the fence. It will curve around the back corner, still continuing downhill along the back fence toward the shed. It will curve around behind the shed and come out between the garage and the shed back toward the other fence, then curve around to become the lower loop.
Before any of this can happen, I'll need to break down those stringers into their constituent parts and rebuild them from scratch to fit the new plan. Being the perfectionist I am, I knew I would have to create a new template that allowed for interchange of parts and held things together in a more rigid and flexible fashion than my hurried first attempt. I tried to do too much with the original, asking it to do two sizes of curves, and it did neither well. For the new one, I started with a piece of ¾" plywood big enough to fit both templates, independent of one another. I used the free "SketchUp" software from Trimble to lay out the template before I even made one cut.
Then I painstakingly drew out the position of all the blocks on the plywood, as well as the paths of the stringer slats, right down to where the spacer blocks should be placed when screwing the stringers together! With this approach, I was able to use much more substantial fasteners than the first attempt too, greatly enhancing the strength and stability. This template also allowed more than half of the stringer to be completed at once, and accounted for shifting the partially completed structure to finish the remaining portion without having to modify the template, unlike the first attempt.
Another thing I did differently this time around was to mark the stringer slats where they would need cut to allow for an "interchangeable parts" approach. So even though each slat starts out a quarter inch thick by an inch and a half wide by eight feet long, I can place them in the template to fit the curved shape they will eventually assume, then mark them to overlap by only 8" after cutting. Once cut, they are easily placed back together and assembled. I had originally tried various thicknesses of slats, starting with one ¾" chunk then two 3⁄8" chunks, but they all wanted to crack before attaining the desired curvature. But three ¼" slats work well, even for the most narrow curves I have, 10' diameter.
This template only handles the 14' and 20' diameter curves, but that's all I'm concerned with at this point anyway. It even handles the "transition curves" from 20' diameter to 14' diameter, simply by constructing one end using the 20' part of the template and the other using the 14' part. Fortunately, each section of 20' diameter track is roughly 4' long, or half the length of a stringer. Very convenient! I soon have the pieces I need assembled. I left a piece of PVC pipe in place at the center of the original loops and it survived the tree removal and sod and everything else that happened over the course of the back yard's transformation!
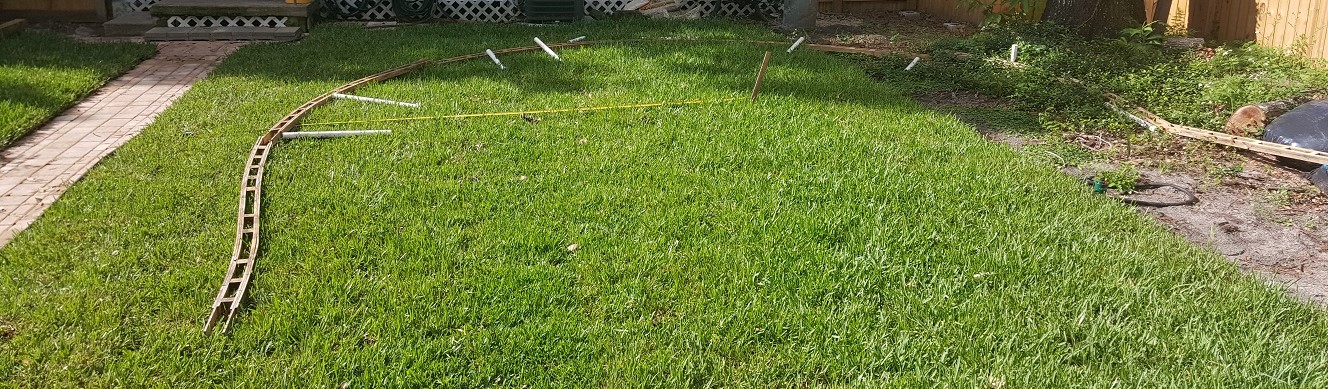
Armed with that as the starting point for the center of the loop, a tape measure and the 1¼" PVC pipe "posts", I begin to layout the upper loop and pound the posts in one by one. Before long, I'm attaching each stringer section to the newly planted posts. When I designed the template, I designed around the outer diameter of the PVC pipe, about 1 5⁄8", and cut blocks that wide to space the two sides apart. It makes for a convenient "slip fit" over the posts. A quick clamp provides support, if need be, while levelling them for attachment using deck screws. This time, the loop continues for about 5⁄8 of a circle before finally straightening out, roughly 45° from the starting tangent. The bridge will go here. At the other end of the bridge is another 1⁄8 circle to bring the track parallel to the starting tangent.
It's been over a year since having to take everything apart just to get back to this point and I still can't run trains! Eventually I'll add more tangent (straight) track parallel along the side fence toward the back fence. From there it will curve to parallel the back fence. When it reaches the other fence, it will make a half circle behind the shed, ending parallel to the back of the garage. It's running downhill at a 1% slope the entire way and should reach ground level by the time it reaches back to the other fence. That's the plan anyway. I put together a tangent section, but even though the slats are "straight", and I thought I fastened everythng together straight, it isn't very straight? Looks like I'll need another template just for straight sections.
(October 2016)
Our niece and her family stopped by to visit while they were down here at Disney. Her son Myles had fun playing with the flea market find engine and some cars. I even connected up a power pack so he could run them back and forth, but he soon grew bored with the whole idea of not having at least a loop of track to run it all the way around. I was just as disappointed as him that we still couldn't run trains. I decided I'd had enough. It's time to get at least a simple loop finished. I constructed the templates I'd need, both for tangent and the 10' diameter curves I'd need for going behind the shed and back. I ripped 2x4 after 2x4 into stringer slats. As I emptied the bin of spacer blocks, I'd cut enough more to refill it, and kept going.
I installed the two runs that parallel the fence first, starting with a stringer and post on one side, then the other, laying out track as I went. When I reached the point where I had to curve around to parallel the back fence, I laid out the center of the curves and placed the posts. I should mention that I was slowly sloping downhill at this point. Half an inch over the run run of the four foot level gave an approximate 1% slope I was looking for. I'd set a chunk of the scale 12"x12" (actual ½"x½") across the rails and set the level down on it and the rail at the other end. When it read level, it was sloping just about right, 1 in 96 anyway, and the stringer could be attached to the posts (as well as the previous stringer).
By making the stringers "interchangeable", I definitely cut the time it took to put things together, with only a small amount of "waste" that needs cut off for the curves. And with the straight sections, there was no waste because nothing needed cut off. That corner was giving me fits though. The curved stringers didn't seem to want to fit the posts, and the curved track didn't seem to want to fit the stringers. I eventually managed to get that much finished, but part of the problem was trying to match the straight sections to those curves and the curves that would wrap around behind the shed. I couldn't really be sure where one would go without the other.
I needed to make another template, just for the 10' diameter sections this time, but that will take time to sketch out and build. I really needed to mock up the 10' diameter curves to ensure the shed would not interfere. The other difficulty is how to get the two 10' curves to be concentric without interfering with each other. I'm not so worried about what it will look like, since most of those 10' curves won't be seen, pretty much hidden by the shed. But I have to put that on hold for now...
I constructed the templates I'd need to assemble the stringers, both for tangents and the 10' diameter curves I'd need for going behind the shed and back. I'd already made the templates for 14' and 20' diameter curves. I ripped 2x4 after 2x4 into ¼" stringer slats with the new table saw. As I emptied the bin of spacer blocks, I'd cut enough more to refill it, and kept going. I installed the two runs that parallel the fence first, starting with a stringer and post on one side, then the other, fastening down the track as I went.